Photo by Andy Li on Unsplash
隨著 K8s 的使用率普及化,為了不同目的或安全性,往往一個企業會同時使用多座 K8s 叢集,而要如何統一管理這些 K8s 環境,也變成一個議題。
在私有雲的情況下,大部分常見的部署工具,像是 Kubespray 或 Kubeadm,在部署完 K8s 叢集之後,部署工具與部屬環境就脫鉤,彼此八竿子打不著。後續如需對環境做升級或節點的增減,須保留原本部署的資訊,進行設定的調整,才能更新整個環境。
在公有雲的情況下,雖然各家公有雲都有自己的 K8s as a Service,可以透過各家的管理介面來管理上面的 K8s 叢集,但是在多雲或混合雲的情況,就需要有另外一個管理角色,來統一管理位在各地的 K8s 叢集,此時就是 Clustering API 所帶來的好處。
Cluster API 概念與架構
Cluster API 是 Kubernetes 的子計畫,透過一個 K8s 來管理多個 K8s 叢集,包含部署、升級、節點數目的控制。
對於使用過 Terraform 的人來說,Cluster API 會很容易上手。下面是 Cluster API 架構的概念圖。
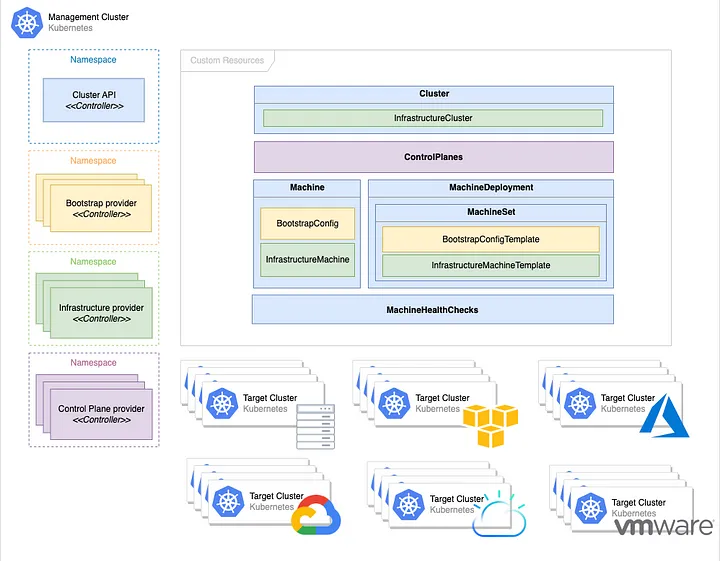
Management Cluster
用來管理多個 K8s 環境的 K8s 叢集。這個叢集需要部署 Cluster API 的 CRDs,以及依不同 infrastructure 會有對應的 provider CRDs。透過 kubectl 可對 K8s 叢集的生命週期進行管理,包含建立、刪除、升級、擴充等。
Workload (Target) Cluster
用來跑 application workload 的 K8s 叢集,就是 Workload Cluster,又叫做 Target Cluster。透過一份 YAML 檔案來描述一座 K8s 叢集,並在 Management Cluster 會有對應的 K8s 資源。
Bootstrap Provider
Bootstrap provider 的目的主要是用來將機器轉換成 K8s 節點,包含:
- 產生 K8s 叢集憑證。
- Control plane 的初始化。
- Control plane 準備好之後,會觸發其它節點的部署。
- 將 control plane 與 worker 節點加入叢集。
Infrastructure Provider
Workload Cluster 可以使用公有雲、虛擬機或是裸機環境,來當作 K8s 的節點。這些不同種類的基礎設施環境,就需要有對應的 provider 來實作出環境的管理邏輯(類似 Terraform 的 provider 定位)。
而在同一個 provider 內,也可以透過不同方式來取得資源,並且有各自的邏輯來部署出 K8s 叢集。例如 AWS 的 EC2 和 EKS,會有自己的 CRDs 來描述。
Machine
Machine 就如同原本 K8s 的 Pod kind,是 K8s 叢集的最小單位。它可以對應到一個裸機、虛擬機,或是公有雲上的虛擬機。當一個 Machine 被刪除時,裸機上的 K8s 相關的套件會被移除,而如果是虛擬機的話就會被直接刪除。
MachineDeployment
MachineDeployment 就類似於原本 K8s 的 Deployment kind,用來定義 worker 的數目和版本等資訊。
MachineSet
MachineSet 就如同原本 K8s 的 ReplicaSet kind,當 worker 要升級時,MachineDeployment 底下會建立一個新的 MachineSet,用來部署一群新的 worker 節點,此過程會保留舊的 MachineSet,依序進行滾動式升級。
功能實測
由於 Cluster API 支援的平台很多樣,這邊挑選了兩種 provider 進行實測,分別是 AWS 以及 VMware 的 BYOH。
前置作業
準備一個 K8s 叢集,透過後續 Cluster API 的安裝步驟,就可以把它當作 Management Cluster。
安裝 clusterctl
clusterctl 是在 Management Cluster 上使用的 command line tool,主要是針對 Management Cluster 的管理,以及產生 Workload Cluster 的 YAML。使用流程上類似於 Terraform CLI。可透過以下方式安裝。
root@mgmt-node:/home/vagrant# curl -L https://github.com/kubernetes-sigs/cluster-api/releases/download/v1.3.2/clusterctl-linux-amd64 -o clusterctl
  % Total    % Received % Xferd  Average Speed   Time    Time     Time  Current
                                 Dload  Upload   Total   Spent    Left  Speed
  0     0    0     0    0     0      0      0 --:--:--  0:00:01 --:--:--     0
100 63.0M  100 63.0M    0     0  3216k      0  0:00:20  0:00:20 --:--:-- 2483k
root@mgmt-node:/home/vagrant# sudo install -o root -g root -m 0755 clusterctl /usr/local/bin/clusterctl
root@mgmt-node:/home/vagrant# clusterctl version
clusterctl version: &version.Info{Major:"1", Minor:"3", GitVersion:"v1.3.2", GitCommit:"18c6e8e6cda0eaf71d509258186fa8db30a8fa62", GitTreeState:"clean", BuildDate:"2023-01-10T13:20:59Z", GoVersion:"go1.19.4", Compiler:"gc", Platform:"linux/amd64"}
Providers 初始化
一開始需要先有初始化的過程,透過以下的指令,將 Cluster API 的 CRD 部署到 Management Cluster 上。
root@mgmt-node:/home/vagrant# clusterctl init
Fetching providers
Installing cert-manager Version="v1.10.1"
Waiting for cert-manager to be available...
Installing Provider="cluster-api" Version="v1.3.2" TargetNamespace="capi-system"
Installing Provider="bootstrap-kubeadm" Version="v1.3.2" TargetNamespace="capi-kubeadm-bootstrap-system"
Installing Provider="control-plane-kubeadm" Version="v1.3.2" TargetNamespace="capi-kubeadm-control-plane-system"

Your management cluster has been initialized successfully!

You can now create your first workload cluster by running the following:

  clusterctl generate cluster [name] --kubernetes-version [version] | kubectl apply -f -
接著,可透過下面指令,安裝對應的 provider。
clusterctl init -- infrastructure {provider}
以 VMware 的 BYOH provider 為例,指令如下。
root@mgmt-node:/home/vagrant# clusterctl init --infrastructure byoh
Fetching providers
Skipping installing cert-manager as it is already installed
Installing Provider="infrastructure-byoh" Version="v0.3.1" TargetNamespace="byoh-system"
而如果是 AWS provider 的話,需要進行以下幾個較複雜的步驟。
下載最新的 clusterawsadm。
root@mgmt-node:/home/vagrant# curl -L https://github.com/kubernetes-sigs/cluster-api-provider-aws/releases/download/v2.0.2/clusterawsadm-linux-amd64 -o clusterawsadm
  % Total    % Received % Xferd  Average Speed   Time    Time     Time  Current
                                 Dload  Upload   Total   Spent    Left  Speed
  0     0    0     0    0     0      0      0 --:--:--  0:00:01 --:--:--     0
100 94.2M  100 94.2M    0     0  4544k      0  0:00:21  0:00:21 --:--:-- 3540k
root@mgmt-node:/home/vagrant# chmod +x clusterawsadm
root@mgmt-node:/home/vagrant# sudo mv clusterawsadm /usr/local/bin
root@mgmt-node:/home/vagrant# clusterawsadm version
clusterawsadm version: &version.Info{Major:"2", Minor:"0", GitVersion:"v2.0.2", GitCommit:"28bc9b8756d6d7f73038604038ddb3ccf4b22396", GitTreeState:"clean", BuildDate:"2022-12-01T13:41:04Z", GoVersion:"go1.18.3", AwsSdkVersion:"v1.44.107", Compiler:"gc", Platform:"linux/amd64"}
建立 IAM 相關資源。
root@mgmt-node:/home/vagrant# export AWS_REGION=ap-northeast-1
root@mgmt-node:/home/vagrant# export AWS_ACCESS_KEY_ID=<your-access-key>
root@mgmt-node:/home/vagrant# export AWS_SECRET_ACCESS_KEY=<your-secret-access-key>
root@mgmt-node:/home/vagrant# clusterawsadm bootstrap iam create-cloudformation-stack
Attempting to create AWS CloudFormation stack cluster-api-provider-aws-sigs-k8s-io

Following resources are in the stack:

Resource                  |Type                                                                                  |Status
AWS::IAM::InstanceProfile |control-plane.cluster-api-provider-aws.sigs.k8s.io                                    |CREATE_COMPLETE
AWS::IAM::InstanceProfile |controllers.cluster-api-provider-aws.sigs.k8s.io                                      |CREATE_COMPLETE
AWS::IAM::InstanceProfile |nodes.cluster-api-provider-aws.sigs.k8s.io                                            |CREATE_COMPLETE
AWS::IAM::ManagedPolicy   |arn:aws:iam::169440074435:policy/control-plane.cluster-api-provider-aws.sigs.k8s.io   |CREATE_COMPLETE
AWS::IAM::ManagedPolicy   |arn:aws:iam::169440074435:policy/nodes.cluster-api-provider-aws.sigs.k8s.io           |CREATE_COMPLETE
AWS::IAM::ManagedPolicy   |arn:aws:iam::169440074435:policy/controllers.cluster-api-provider-aws.sigs.k8s.io     |CREATE_COMPLETE
AWS::IAM::ManagedPolicy   |arn:aws:iam::169440074435:policy/controllers-eks.cluster-api-provider-aws.sigs.k8s.io |CREATE_COMPLETE
AWS::IAM::Role            |control-plane.cluster-api-provider-aws.sigs.k8s.io                                    |CREATE_COMPLETE
AWS::IAM::Role            |controllers.cluster-api-provider-aws.sigs.k8s.io                                      |CREATE_COMPLETE
AWS::IAM::Role            |eks-controlplane.cluster-api-provider-aws.sigs.k8s.io                                 |CREATE_COMPLETE
AWS::IAM::Role            |nodes.cluster-api-provider-aws.sigs.k8s.io                                            |CREATE_COMPLETE
最後進行 AWS provider 的下載與初始化。
root@mgmt-node:/home/vagrant# export AWS_B64ENCODED_CREDENTIALS=$(clusterawsadm bootstrap credentials encode-as-profile)

WARNING: `encode-as-profile` should only be used for bootstrapping.

root@mgmt-node:/home/vagrant# clusterctl init --infrastructure aws
Fetching providers
Skipping installing cert-manager as it is already installed
Installing Provider="infrastructure-aws" Version="v2.0.2" TargetNamespace="capa-system"
建立 BYOH Workload Cluster
如果使用 VMware 的 BYOH provider,在建立 workload cluster 之前,必須先將 host 註冊到 management cluster,加入 BYOH 的資源池內。
首先要被註冊的 host 必須先進行以下步驟,來安裝相關套件。
root@node-1:/home/vagrant# sudo apt-get install socat ebtables ethtool conntrack
Reading package lists... Done
Building dependency tree
Reading state information... Done
Suggested packages:
  nftables
The following NEW packages will be installed:
  conntrack ebtables ethtool socat
0 upgraded, 4 newly installed, 0 to remove and 4 not upgraded.
Need to get 567 kB of archives.
After this operation, 2,229 kB of additional disk space will be used.
...
Processing triggers for man-db (2.9.1-1) ...
root@node-1:/home/vagrant# HOSTNAME=`hostname`
root@node-1:/home/vagrant# sed -i "s/127\.0\.0\.1\t/127\.0\.0\.1\t$HOSTNAME /g" /etc/hosts
root@node-1:/home/vagrant# wget https://github.com/vmware-tanzu/cluster-api-provider-bringyourownhost/releases/download/v0.3.1/byoh-hostagent-linux-amd64
--2023-01-30 07:58:12--  https://github.com/vmware-tanzu/cluster-api-provider-bringyourownhost/releases/download/v0.3.1/byoh-hostagent-linux-amd64
...
root@node-1:/home/vagrant# chmod +x byoh-hostagent-linux-amd64
再將 management cluster 的 kube config 的內容寫到一個 bootstrap-kubeconfig.conf 檔案內,並透過以下步驟啟動 byoh hostagent。
root@node-1:/home/vagrant# ./byoh-hostagent-linux-amd64 --bootstrap-kubeconfig bootstrap-kubeconfig.conf > byoh-agent.log 2>&1 &
[1] 3046
root@node-1:/home/vagrant# tail -f byoh-agent.log
I0130 08:07:36.621380    3046 controller.go:178] controller/byohost "msg"="Starting EventSource" "reconciler group"="infrastructure.cluster.x-k8s.io" "reconciler kind"="ByoHost" "source"="kind source: *v1beta1.ByoHost"
I0130 08:07:36.621461    3046 controller.go:186] controller/byohost "msg"="Starting Controller" "reconciler group"="infrastructure.cluster.x-k8s.io" "reconciler kind"="ByoHost"
...
I0130 08:07:36.881235    3046 host_reconciler.go:89] controller/byohost "msg"="reconcile normal" "ByoHost"="node-1" "name"="node-1" "namespace"="default" "reconciler group"="infrastructure.cluster.x-k8s.io" "reconciler kind"="ByoHost"
I0130 08:07:36.881307    3046 host_reconciler.go:91] controller/byohost "msg"="Machine ref not yet set" "ByoHost"="node-1" "name"="node-1" "namespace"="default" "reconciler group"="infrastructure.cluster.x-k8s.io" "reconciler kind"="ByoHost"
接著到 management cluster 使用 BYOHosts List 指令,host agent 有成功註冊上,就會顯示在列表內。
root@mgmt-node:/home/vagrant# kubectl get byoh
NAME        OSNAME   OSIMAGE              ARCH
node-1      linux    Ubuntu 20.04.3 LTS   amd64
每個 host 都需重複上述步驟,將它們註冊到 management cluster 上。後續如需使用 BYOH provider 部署 K8s 叢集,都會從這個列表內,取得可用的節點。
以下是透過 BYOH provider 建立 K8s 叢集的步驟。
(查看所有註冊 host)
root@mgmt-node:/home/vagrant# kubectl get byoh
NAME        OSNAME   OSIMAGE              ARCH
node-1      linux    Ubuntu 20.04.3 LTS   amd64
node-2      linux    Ubuntu 20.04.3 LTS   amd64
node-3      linux    Ubuntu 20.04.3 LTS   amd64
node-4      linux    Ubuntu 20.04.3 LTS   amd64
node-5      linux    Ubuntu 20.04.3 LTS   amd64
node-6      linux    Ubuntu 20.04.3 LTS   amd64

(產生 K8s cluster yaml,包含一個 control plane,一個 worker,使用 v1.24.2。CONTROL_PLANE_ENDPOINT_IP 的 IP 必須跟你的 host 在同一個網段,並且還不能被任何 host 使用。)
root@mgmt-node:/home/vagrant# CONTROL_PLANE_ENDPOINT_IP=10.15.160.7 clusterctl generate cluster byoh-cluster --infrastructure byoh --kubernetes-version v1.24.2 --control-plane-machine-count 1 --worker-machine-count 1 > cluster.yaml

(建立 K8s cluster)
root@mgmt-node:/home/vagrant# kubectl apply -f cluster.yaml
kubeadmconfigtemplate.bootstrap.cluster.x-k8s.io/byoh-cluster-md-0 created
cluster.cluster.x-k8s.io/byoh-cluster created
machinedeployment.cluster.x-k8s.io/byoh-cluster-md-0 created
kubeadmcontrolplane.controlplane.cluster.x-k8s.io/byoh-cluster-control-plane created
byocluster.infrastructure.cluster.x-k8s.io/byoh-cluster created
byomachinetemplate.infrastructure.cluster.x-k8s.io/byoh-cluster-control-plane created
byomachinetemplate.infrastructure.cluster.x-k8s.io/byoh-cluster-md-0 created
k8sinstallerconfigtemplate.infrastructure.cluster.x-k8s.io/byoh-cluster-control-plane created
k8sinstallerconfigtemplate.infrastructure.cluster.x-k8s.io/byoh-cluster-md-0 created

(查看被使用的 BYOMachines List,可以看到有兩個 BYOH 節點正被拿去使用。透過 describe 指令可以進一步查到是哪一個 machine 被指派)
root@mgmt-node:/home/vagrant# kubectl get byom
NAME                               AGE
byoh-cluster-control-plane-nk7tn   3m36s
byoh-cluster-md-0-9hdlw            3m39s

(使用 Cluster API 的 Machine List,可以查看兩個 machine 的狀態)
root@mgmt-node:/home/vagrant# kubectl get ma
NAME                                 CLUSTER        NODENAME    PROVIDERID                PHASE     AGE   VERSION
byoh-cluster-control-plane-tn4rn     byoh-cluster   node-3      byoh://node-3/fkp9qj      Running   12m   v1.24.2
byoh-cluster-md-0-5495cdb4cf-79q9d   byoh-cluster   node-4      byoh://node-4/owwggf      Running   12m   v1.24.2

(查看 K8s cluster 部署狀態)
root@mgmt-node:/home/vagrant# clusterctl describe cluster byoh-cluster
NAME                                                                       READY  SEVERITY  REASON                       SINCE  MESSAGE
Cluster/byoh-cluster                                                       True                                          6m3s
├─ClusterInfrastructure - ByoCluster/byoh-cluster
├─ControlPlane - KubeadmControlPlane/byoh-cluster-control-plane            True                                          6m3s
│ └─Machine/byoh-cluster-control-plane-tn4rn                               True                                          6m5s
│   └─MachineInfrastructure - ByoMachine/byoh-cluster-control-plane-nk7tn
└─Workers
  └─MachineDeployment/byoh-cluster-md-0                                    False  Warning   WaitingForAvailableMachines  9m54s  Minimum availability requires 1 replicas, current 0 available
    └─Machine/byoh-cluster-md-0-5495cdb4cf-79q9d                           True                                          4m25s
      └─MachineInfrastructure - ByoMachine/byoh-cluster-md-0-9hdlw
root@mgmt-node:/home/vagrant#
等 K8s 叢集的 control plane 完成初始化後,接著進行以下步驟。
(先確認 control plane 的 INITIALIZED 為 true)
root@mgmt-node:/home/vagrant# kubectl get kubeadmcontrolplane
NAME                          CLUSTER         INITIALIZED   API SERVER AVAILABLE   REPLICAS   READY   UPDATED   UNAVAILABLE   AGE     VERSION
byoh-cluster-control-plane    byoh-cluster    true                                 1                  1         1             5h      v1.24.2

(取得 kubeconfig)
root@mgmt-node:/home/vagrant# clusterctl get kubeconfig byoh-cluster > byoh-cluster.kubeconfig
root@mgmt-node:/home/vagrant# KUBECONFIG=byoh-cluster.kubeconfig kubectl get nodes
NAME        STATUS     ROLES           AGE     VERSION
node-3      NotReady   control-plane   5h30m   v1.24.2
node-4      NotReady   <none>          5h28m   v1.24.2

(需要安裝完 CNI,nodes 的 status 才會變 ready)
root@mgmt-node:/home/vagrant# KUBECONFIG=byoh-cluster.kubeconfig kubectl apply -f https://docs.projectcalico.org/v3.20/manifests/calico.yaml
configmap/calico-config created
customresourcedefinition.apiextensions.k8s.io/bgpconfigurations.crd.projectcalico.org created
...
root@mgmt-node:/home/vagrant# KUBECONFIG=byoh-cluster.kubeconfig kubectl get nodes
NAME        STATUS   ROLES           AGE   VERSION
node-3      Ready    control-plane   17h   v1.24.2
node-4      Ready    <none>          17h   v1.24.2
通過以上步驟,就完成了 BYOH 的 K8s 叢集部署。
建立 AWS Workload Cluster
使用 AWS provider 前,必須先在 AWS 上有註冊帳號,並且在上面建立一個 default 的 ssh key。
接著在 management cluster,透過以下步驟建立 K8s 叢集。
(Set enviroment variables)
root@mgmt-node:/home/vagrant# export AWS_SSH_KEY_NAME=default
root@mgmt-node:/home/vagrant# export AWS_CONTROL_PLANE_MACHINE_TYPE=t3.large
root@mgmt-node:/home/vagrant# export AWS_NODE_MACHINE_TYPE=t3.large

(產生 K8s cluster yaml,flavor 的內容可參考 [GitHub templates](https://github.com/kubernetes-sigs/cluster-api-provider-aws/tree/main/templates),kubernetes-version 必須到 AWS EKS 查詢可用版本)
root@mgmt-node:/home/vagrant# clusterctl generate cluster capi-quickstart --infrastructure aws --flavor eks --kubernetes-version v1.24.0 --control-plane-machine-count=3 --worker-machine-count=3 > capi-quickstart.yaml

(建立 K8s cluster)
root@mgmt-node:/home/vagrant# kubectl apply -f capi-quickstart.yaml
cluster.cluster.x-k8s.io/capi-quickstart created
awsmanagedcluster.infrastructure.cluster.x-k8s.io/capi-quickstart created
awsmanagedcontrolplane.controlplane.cluster.x-k8s.io/capi-quickstart-control-plane created
machinedeployment.cluster.x-k8s.io/capi-quickstart-md-0 created
awsmachinetemplate.infrastructure.cluster.x-k8s.io/capi-quickstart-md-0 created
eksconfigtemplate.bootstrap.cluster.x-k8s.io/capi-quickstart-md-0 created

(使用 Cluster API 的 MachineDeployment List,可以查看 machine deployment 的狀態)
root@mgmt-node:/home/vagrant# kubectl get md
NAME                   CLUSTER           REPLICAS   READY   UPDATED   UNAVAILABLE   PHASE       AGE   VERSION
capi-quickstart-md-0   capi-quickstart   3                  3         3             ScalingUp   7s    v1.24.0

(使用 Cluster API 的 Machine List,可以查看三台 machines 的狀態)
root@mgmt-node:/home/vagrant# kubectl get ma
NAME                                    CLUSTER           NODENAME   PROVIDERID   PHASE     AGE   VERSION
capi-quickstart-md-0-6b9c487d45-95bfv   capi-quickstart                           Pending   11s   v1.24.0
capi-quickstart-md-0-6b9c487d45-dg67c   capi-quickstart                           Pending   11s   v1.24.0
capi-quickstart-md-0-6b9c487d45-ss4vh   capi-quickstart                           Pending   10s   v1.24.0

(等待一陣子之後,可以看到 K8s cluster 被正常運行起來)
root@mgmt-node:/home/vagrant# kubectl get md
NAME                   CLUSTER           REPLICAS   READY   UPDATED   UNAVAILABLE   PHASE     AGE   VERSION
capi-quickstart-md-0   capi-quickstart   3          3       3         0             Running   19m   v1.24.0
root@mgmt-node:/home/vagrant# kubectl get ma
NAME                                    CLUSTER           NODENAME                                          PROVIDERID                                   PHASE     AGE   VERSION
capi-quickstart-md-0-6b9c487d45-95bfv   capi-quickstart   ip-10-0-123-190.ap-northeast-1.compute.internal   aws:///ap-northeast-1a/i-04f2fb77dbba25649   Running   19m   v1.24.0
capi-quickstart-md-0-6b9c487d45-dg67c   capi-quickstart   ip-10-0-108-92.ap-northeast-1.compute.internal    aws:///ap-northeast-1a/i-01d91915ca14da1e4   Running   19m   v1.24.0
capi-quickstart-md-0-6b9c487d45-ss4vh   capi-quickstart   ip-10-0-108-17.ap-northeast-1.compute.internal    aws:///ap-northeast-1a/i-032225c04f78d2f89   Running   19m   v1.24.0
root@mgmt-node:/home/vagrant# clusterctl describe cluster capi-quickstart
NAME                                                                   READY  SEVERITY  REASON  SINCE  MESSAGE
Cluster/capi-quickstart                                                True                     10m
├─ClusterInfrastructure - AWSManagedCluster/capi-quickstart
├─ControlPlane - AWSManagedControlPlane/capi-quickstart-control-plane  True                     10m
└─Workers
  └─MachineDeployment/capi-quickstart-md-0                             True                     6m13s
    └─3 Machines...                                                    True                     9m26s  See capi-quickstart-md-0-6b9c487d45-95bfv, capi-quickstart-md-0-6b9c487d45-dg67c, ...

(取得 kubeconfig)
root@mgmt-node:/home/vagrant# clusterctl get kubeconfig capi-quickstart > capi-quickstart.kubeconfig

(EKS 建立出來的 cluster,透過 kubectl 查看的 nodes,只會看到 worker node。)
root@mgmt-node:/home/vagrant# KUBECONFIG=capi-quickstart.kubeconfig kubectl get nodes
NAME                                              STATUS   ROLES    AGE     VERSION
ip-10-0-108-17.ap-northeast-1.compute.internal    Ready    <none>   9m37s   v1.24.9-eks-49d8fe8
ip-10-0-108-92.ap-northeast-1.compute.internal    Ready    <none>   12m     v1.24.9-eks-49d8fe8
ip-10-0-123-190.ap-northeast-1.compute.internal   Ready    <none>   12m     v1.24.9-eks-49d8fe8
到 AWS 的 EKS 介面上,可以看到新建立出來的 K8s 叢集。
升級 K8s 叢集
由 Cluster API 所管理的 K8s 叢集,可以很簡單的對 controller 與 worker 做版本升級。不過,BYOH provider 在使用上有些限制,無法成功對 controller 升級(詳細的原因會在這篇文章的最後結論做解釋),因此接著會以 AWS 當範例,演示如何進行 K8s 叢集的升級。
以下範例是對一個 v1.23 的 AWS K8s 叢集(1 worker),將 worker node 升級至 v1.24。
(透過以下指令進入 md edit 模式後,將 K8s version 改成想要升級的版本即可)
root@mgmt-node:/home/vagrant# kubectl edit md capi-quickstart-md-0
machinedeployment.cluster.x-k8s.io/capi-quickstart-md-0 edited

(可以看到 replicas 變成 2)
root@mgmt-node:/home/vagrant# kubectl get md
NAME                   CLUSTER           REPLICAS   READY   UPDATED   UNAVAILABLE   PHASE     AGE   VERSION
capi-quickstart-md-0   capi-quickstart   2          1       1         1             Running   44m   v1.24.0

(可以看到另一個 v1.24 的 ma 被建立)
root@mgmt-node:/home/vagrant# kubectl get ma
NAME                                    CLUSTER           NODENAME                                          PROVIDERID                                   PHASE         AGE   VERSION
capi-quickstart-md-0-69847874f6-snsv2   capi-quickstart   ip-10-0-125-132.ap-northeast-1.compute.internal   aws:///ap-northeast-1a/i-0704c4f904f2ba18a   Running       44m   v1.23.0
capi-quickstart-md-0-6b9c487d45-7xz5h   capi-quickstart                                                     aws:///ap-northeast-1a/i-0d03f2a25f453e2df   Provisioned   28s   v1.24.0

(新的 ma 被建立後,可以看到舊的 ma 正在被刪除)
root@mgmt-node:/home/vagrant# kubectl get ma
NAME                                    CLUSTER           NODENAME                                          PROVIDERID                                   PHASE      AGE   VERSION
capi-quickstart-md-0-69847874f6-snsv2   capi-quickstart   ip-10-0-125-132.ap-northeast-1.compute.internal   aws:///ap-northeast-1a/i-0704c4f904f2ba18a   Deleting   45m   v1.23.0
capi-quickstart-md-0-6b9c487d45-7xz5h   capi-quickstart   ip-10-0-95-98.ap-northeast-1.compute.internal     aws:///ap-northeast-1a/i-0d03f2a25f453e2df   Running    83s   v1.24.0
root@mgmt-node:/home/vagrant# kubectl get md
NAME                   CLUSTER           REPLICAS   READY   UPDATED   UNAVAILABLE   PHASE         AGE   VERSION
capi-quickstart-md-0   capi-quickstart   2          2       1         0             ScalingDown   45m   v1.24.0

(最後可以看到 md 被更新至 v1.24)
root@mgmt-node:/home/vagrant# kubectl get md
NAME                   CLUSTER           REPLICAS   READY   UPDATED   UNAVAILABLE   PHASE     AGE   VERSION
capi-quickstart-md-0   capi-quickstart   1          1       1         0             Running   46m   v1.24.0
root@mgmt-node:/home/vagrant# KUBECONFIG=capi-quickstart.kubeconfig kubectl get nodes
NAME                                            STATUS   ROLES    AGE     VERSION
ip-10-0-95-98.ap-northeast-1.compute.internal   Ready    <none>   3m14s   v1.24.9-eks-49d8fe8
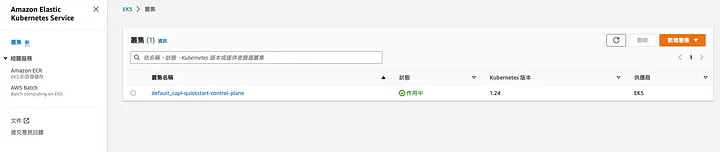
但 worker 升級後,在 AWS EKS 的叢集頁面,看到的版本依然會是 v1.23,因為這個地方顯示的是 controller 版本。(如下圖)


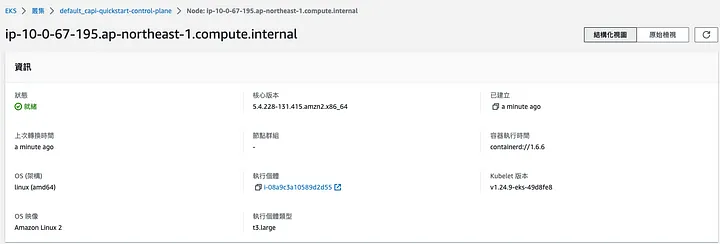
worker 的版本必須進入 node 頁面,就可以看到 Kubelet 版本資訊。
AWS 的 K8s controller 是透過 AWS provider 的 CRD 來定義。透過以下指令可以先查看 AWS provider 有提供哪些新的 CRD。
root@mgmt-node:/home/vagrant# kubectl api-resources | grep AWS
awsmanagedcontrolplanes           awsmcp       controlplane.cluster.x-k8s.io/v1beta2     true         AWSManagedControlPlane
awsclustercontrolleridentities    awsci        infrastructure.cluster.x-k8s.io/v1beta2   false        AWSClusterControllerIdentity
awsclusterroleidentities          awsri        infrastructure.cluster.x-k8s.io/v1beta2   false        AWSClusterRoleIdentity
awsclusters                       awsc         infrastructure.cluster.x-k8s.io/v1beta2   true         AWSCluster
awsclusterstaticidentities        awssi        infrastructure.cluster.x-k8s.io/v1beta2   false        AWSClusterStaticIdentity
awsclustertemplates               awsct        infrastructure.cluster.x-k8s.io/v1beta2   true         AWSClusterTemplate
awsfargateprofiles                awsfp        infrastructure.cluster.x-k8s.io/v1beta2   true         AWSFargateProfile
awsmachinepools                   awsmp        infrastructure.cluster.x-k8s.io/v1beta2   true         AWSMachinePool
awsmachines                       awsm         infrastructure.cluster.x-k8s.io/v1beta2   true         AWSMachine
awsmachinetemplates               awsmt        infrastructure.cluster.x-k8s.io/v1beta2   true         AWSMachineTemplate
awsmanagedclusters                awsmc        infrastructure.cluster.x-k8s.io/v1beta2   true         AWSManagedCluster
awsmanagedmachinepools            awsmmp       infrastructure.cluster.x-k8s.io/v1beta2   true         AWSManagedMachinePool
以下是透過編輯 AWSManagedControlPlane 的版本,來對 K8s 叢集升級。
root@mgmt-node:/home/vagrant# kubectl get awsmcp
NAME                            CLUSTER           READY   VPC                     BASTION IP
capi-quickstart-control-plane   capi-quickstart   true    vpc-0c4c89914e12c3de8
root@mgmt-node:/home/vagrant# kubectl edit awsmcp capi-quickstart-control-plane
awsmanagedcontrolplane.controlplane.cluster.x-k8s.io/capi-quickstart-control-plane edited
在 AWS EKS 的叢集頁面,可以看到 controller 的版本正在更新。更新完成後就會呈現新的版本資訊。

更新完 controller 之後,原本的 kubeconfig 會失效,必須重新取得新的 kubeconfig 才能使用。
root@mgmt-node:/home/vagrant# KUBECONFIG=capi-quickstart.kubeconfig kubectl get nodes
error: You must be logged in to the server (Unauthorized)
root@mgmt-node:/home/vagrant# clusterctl get kubeconfig capi-quickstart > capi-quickstart.kubeconfig2
root@mgmt-node:/home/vagrant# diff capi-quickstart.kubeconfig capi-quickstart.kubeconfig2
18c18
<     token: k8s-aws-v1.aHR0cHM6Ly9zdHMuYW1hem9uYXdzLmNvbS8_QWN0aW9uPUdldENhbGxlcklkZW50aXR5JlZlcnNpb249MjAxMS0wNi0xNSZYLUFtei1BbGdvcml0aG09QVdTNC1ITUFDLVNIQTI1NiZYLUFtei1DcmVkZW50aWFsPUFLSUFTTzQzS0xMQlQzWTJOUUhIJTJGMjAyMzAyMDMlMkZ1cy1lYXN0LTElMkZzdHMlMkZhd3M0X3JlcXVlc3QmWC1BbXotRGF0ZT0yMDIzMDIwM1QwNDM1MjJaJlgtQW16LUV4cGlyZXM9OTAwJlgtQW16LVNpZ25lZEhlYWRlcnM9aG9zdCUzQngtazhzLWF3cy1pZCZYLUFtei1TaWduYXR1cmU9YjNjNWQzMDc0OWRlNmUzZmRjZjk4YmZiZWIyYzMwMzliMzQ3YjFiMDRkNDY0YTU2OWJkNTNkODE0OGIzZGEyOQ
---
>     token: k8s-aws-v1.aHR0cHM6Ly9zdHMuYW1hem9uYXdzLmNvbS8_QWN0aW9uPUdldENhbGxlcklkZW50aXR5JlZlcnNpb249MjAxMS0wNi0xNSZYLUFtei1BbGdvcml0aG09QVdTNC1ITUFDLVNIQTI1NiZYLUFtei1DcmVkZW50aWFsPUFLSUFTTzQzS0xMQlQzWTJOUUhIJTJGMjAyMzAyMDMlMkZ1cy1lYXN0LTElMkZzdHMlMkZhd3M0X3JlcXVlc3QmWC1BbXotRGF0ZT0yMDIzMDIwM1QwNDUzNTNaJlgtQW16LUV4cGlyZXM9OTAwJlgtQW16LVNpZ25lZEhlYWRlcnM9aG9zdCUzQngtazhzLWF3cy1pZCZYLUFtei1TaWduYXR1cmU9MTI2MmM4MTk4YjI0ZjFjYTAxOWJmYjJhNzBiNDQ2Yzk2MjY5YWQ3YWE3NWEwNzQ4MjRmZjRlMWYxODE5YWEwYw
root@mgmt-node:/home/vagrant# KUBECONFIG=capi-quickstart.kubeconfig2 kubectl get nodes
NAME                                             STATUS   ROLES    AGE   VERSION
ip-10-0-67-195.ap-northeast-1.compute.internal   Ready    <none>   16m   v1.24.9-eks-49d8fe8
ip-10-0-95-98.ap-northeast-1.compute.internal    Ready    <none>   21m   v1.24.9-eks-49d8fe8
新增/刪除 K8s 節點
與升級 K8s 叢集相同,新增或刪除 K8s 節點只需要針對對應的 CRD 修改 replicas 參數即可。
由於 AWS 的 K8s controller 沒有 replicas 可以設定,所以只有 worker 可以調整數目。以下範例示意如何改變 worker node 數目。
(原本 kubectl 只有看到一個 worker node)
root@mgmt-node:/home/vagrant# KUBECONFIG=capi-quickstart.kubeconfig kubectl get nodes
NAME                                            STATUS   ROLES    AGE     VERSION
ip-10-0-95-98.ap-northeast-1.compute.internal   Ready    <none>   3m14s   v1.24.9-eks-49d8fe8

(編輯 md 的 replicas,將原本的 worker 數目從 1 -> 2)
root@mgmt-node:/home/vagrant# kubectl edit md capi-quickstart-md-0
machinedeployment.cluster.x-k8s.io/capi-quickstart-md-0 edited

(可以看到 md 開始 scaling up)
root@mgmt-node:/home/vagrant# kubectl get md
NAME                   CLUSTER           REPLICAS   READY   UPDATED   UNAVAILABLE   PHASE       AGE   VERSION
capi-quickstart-md-0   capi-quickstart   2          1       2         1             ScalingUp   50m   v1.24.0

(等待 md scaling up 完成)
root@mgmt-node:/home/vagrant# kubectl get md
NAME                   CLUSTER           REPLICAS   READY   UPDATED   UNAVAILABLE   PHASE     AGE   VERSION
capi-quickstart-md-0   capi-quickstart   2          2       2         0             Running   52m   v1.24.0

(透過 kubectl 可以看到 worker node 數目新增為 2 個)
root@mgmt-node:/home/vagrant# KUBECONFIG=capi-quickstart.kubeconfig kubectl get nodes
NAME                                             STATUS   ROLES    AGE   VERSION
ip-10-0-67-195.ap-northeast-1.compute.internal   Ready    <none>   13m   v1.24.9-eks-49d8fe8
ip-10-0-95-98.ap-northeast-1.compute.internal    Ready    <none>   18m   v1.24.9-eks-49d8fe8
結論
VMware 的 BYOH 實測結果,不是所有 K8s 版本都能成功部署,大部分失敗都是卡在無法從 VMware Harbor 下載 bundle image(從 byoh agent log 可以看到會失敗在下載 bundle image 階段)。在 2023 年初的測試結果,只有 v1.23.5 和 v1.24.2 能部署,其它版本都會失敗,推測是因為這些在 registry 上的 image,都被設定成不公開,只有 v1.23.5 和 v1.24.2 被設定成公開可以下載。BYOH 屬於 VMware 實驗性質的 provider,所以 K8s 可支援的版本很少。上述原因也導致了 BYOH 的 K8s controller 無法像 worker 順利升級,因為 Cluster API 會限制 K8s 升級的版號相依(如下註解),但 BYOH 使用的 VMware registry 上沒有對應可用的版本。
kubeadmcontrolplanes.controlplane.cluster.x-k8s.io “byoh-cluster-control-plane” was not valid:
spec.version: Forbidden: cannot upgrade to a Kubernetes/kubeadm version which is using the old default registry. Please use a newer Kubernetes patch release which is using the new default registry (>= v1.22.17, >= v1.23.15, >= v1.24.9)
AWS 需要先準備好相關資源(如 access key、secret access key、ssh keypairs、IAM…),但不需要安裝 agent。雖然 K8s controller 可以指定版本,但無法從 kubectl 看到 controller node 相關資訊,也無法指定 controller 數目。
無論是使用哪種 providers,Cluster API 都可以很簡單地透過修改 CRD attributes(如 MachineDeployment 的 replicas 或 version),來增減節點數目或對 K8s 叢集升級。相較於其它單純的 K8s 部署工具,Cluster API 可以更方便的管理多座 K8s 叢集的生命週期,但不同的 provider 支援的情況也有所差異。
參考資料
- https://cluster-api.sigs.k8s.io/user/quick-start.html
- https://github.com/vmware-tanzu/cluster-api-provider-bringyourownhost/blob/v0.3.1/docs/getting_started.md
- https://github.com/kubernetes-sigs/cluster-api-provider-aws/tree/main/templates
–